
I’m not an artist, in the paint and paintbrush sense of the word, but I do consider my blog a work of art. It’s my artistic endeavor, it’s how I share myself with the world. It’s where I let people glimpse into me, my life, and how it feels to be a work at home mom… as well as provide kick ass information and encouragement for others on a similar journey.
With that said… how your content looks really matters. Now I’m not saying you have to be a graphic designer or Van Gogh to create a beautiful gorgeous blog that people want feel compelled to share. In fact, it can be as simple as a couple little steps, and maybe looking at your blog with a 2 degree shift in perspective.
You might have noticed this isn’t a food blog, where I think it’s easy to see how you can make a gorgeous, shareable blog… just show tons of food porn right? Yeah, I don’t much have the luxury of food porn (and I’m not that great a food photographer) so I’m going to show you how you can turn your blog, even a blog about marketing, into a work of art.
Creating a Work of Art
Format your post!
When you’re turning your boring marketing blog into a work of art there are a few steps you’re going to take. The first of which is formatting your post. It can be tough to read on a computer, and even tougher if people are reading on a phone (and believe me… they are!). Make sure you leave plenty of white space between your words.
This isn’t English 101. It’s ok to have 1 sentence in a paragraph. 🙂
It’s also a great idea to use bold, and italics to draw the readers eye to the next element of the post. Please, please, hear me here… I am NOT saying you should bold and highlight every other sentence of your post. Please don’t do that.. it looks awful and makes people immediately click away from your blog. Use bold sparingly as a way to help the readers eye continue to move down the page. Use italics as a way to emphasize a thought or feeling in the post. You know, when you’re raising your eyebrows as you write the words because they have some oomph to them? Yeah, make that point with a little italics.
Use images!
Images can make or break your content. If you are not using images in your post you’re missing the boat. For real. Not only are you not providing any visual stimuli to your readers, you’re not giving them anything they can PIN (you know, to pinterest, that’s the whole sharing part, which brings you more traffic!) your post. A post MUST have an image to be pinned… and posts with images get a LOT more attention on all social media platforms.
Creating gorgeous images doesn’t have to be tough, in fact, they don’t have to be gorgeous either. They do have to grab the reader’s attention though. There are plenty of places you can get free non copyrighted images to start with. I personally use morguefile.com most of the time.
When you start your image creation process do this… think about the FEELING of the post you’re writing. How do you want the reader to feel… what is the tone? Is it a happy go lucky post? Do you want them to feel inspired? Do you want them to feel powerful? This question is important because whatever feeling you want your reader to have is the feeling the image needs to convey.
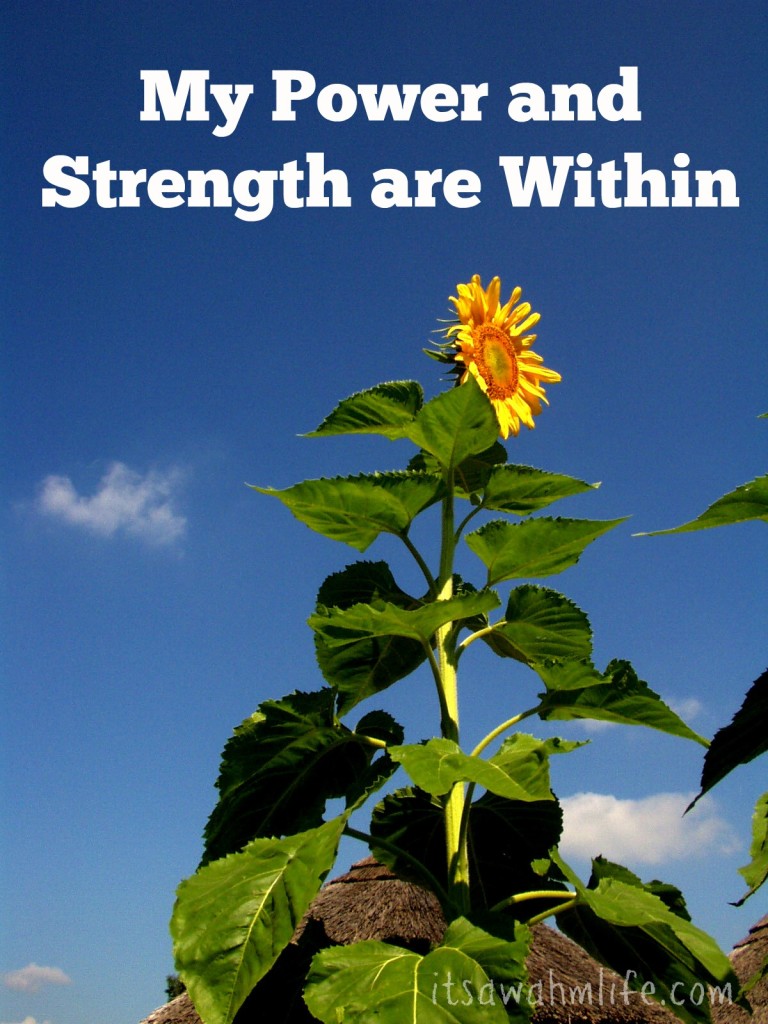
Once you’ve got the feeling in mind, think about something that creates that feeling. I create a lot of stand alone image content (to share on social media). Today the image I created was around the qoute/mantra My power and strength are within. I wanted people to really feel that and believe it… and nothing says that to me more than a single flowers standing tall… I mean, can you imagine the strength it takes to be a flower? (especially in this Kansas wind?!). So I went to morguefile.com and did a little searching and finally found an image of a lone sunflowers standing tall against a gorgeous blue sky. It was perfect.
Once you find your image, head over to Picmonkey. Another of my favorite sites on the internet. It’s free (or you can upgrade for extra special stuff that’s very cool and well worth the minimal monthly fee). Choose the edit option and pull up the image you’ve chosen for your post. Choose a font that fits the feeling you want to project. I wanted to portray power and strength so I chose a bold chunky font for my words. If you really start looking at the world this way you’ll realize just about everything around you creates some sort of reaction or emotion. It’s your job to choose things that create the reaction or emotion that you’re trying to pull from your readers.
When you’re putting words on your image think about what you want to say. You can use the title of your post. You can use a quote from your post. You can use a quote that’s not in your post, but is totally relevant to what you’re talking about. The key is to create the same feeling in your image as you want readers to get from reading your post.
And… a little bit of curiosity.
You don’t want to tell the whole story in the image or there will be no reason left for them to click through and read your post. 🙂
Let’s look at an example so you can see what I mean.
Earlier this week I wrote a post about a Google + experiment I am doing this week. The emotion I wanted to create was excitement and I wanted people to feel like it was something they could do too.
I wasn’t really sure what I wanted to do for the image, but after looking around in Pickmonkey for a bit it hit me… it’s an experiment. Where do people mostly do experiments? In school. So I grabbed some “lined paper” background, used a handwriting font, and outlined the experiment and purpose (creating curiosity to know the exact steps) in the image. I grabbed some logos ~ which are universally recognized, and give a punch of color to the image.
Here it is:
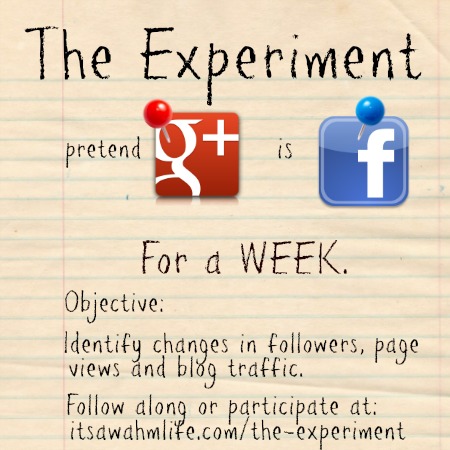
You can see I also included a CTA to follow along or participate, and the address to the post. Having a call to action in your image is a great way to get people to do what you want them to do… and click to your post. Having your url on the image is also a great idea in case, somehow, someway, (lol) your image gets separated from the post… people will still be able to find your blog.
I don’t always use the specific post in the url… usually just the homepage url, but in this image the exact post worked. I also went back and changed the permalink to the post so it was shorter and would fit easily and clearly in the image. 😉
I also created a second image (yes! it’s ok to have multiple images in your post!) that drew attention to the actual action steps of the experiment. This also allowed me to share two different images, both of which created curiosity when sharing to social media platforms.
Make sure people can share your content!
This last one is a doozy… yes, you’ve got share buttons on your blog, (right?!), but do they work from a mobile device? Go ahead, I know it’s sitting right next to you… pick up your phone and look. Go to your blog right now, on your phone, and see if you can share your last post through the share buttons on your site.
The thing is, some buttons will show up, but they won’t work. Some buttons, like those beautiful floating buttons from the digg digg plugin won’t even show UP on a mobile device! So make sure your buttons work… if your buttons aren’t working, then find a new plugin because your readers really are reading on their devices and if they can’t easily share you’re missing out.
The last thing is going to pull together formatting and sharing.. it’s a handy little plugin called click to tweet. You install it on your blog, and then you can create tweetable portions of your blog. They stand out in a nice big box, which breaks up large sections of content (which is good), and allows people to tweet right from the post without going anywhere… and link back to your site.
[Tweet “How to easily turn a boring blog into a work of art that must be shared. “]
You see, right up there, that’s it! Go ahead and tweet it. You can pull “tweetable” sentences out and use click to tweet, or you can use a quote that is relevant… there are so many ways you can use click to tweet and every single post I’ve put one in gets tweeted more than the ones that don’t have it. So, yeah, it works too, which is always a bonus.
So there you go… it’s time to turn your boring blog into a work of art. You can do it. It might seem a little scary or overwhelming but I assure you it gets easier the more you do it, it gets quicker the more you do it, and it will make a HUGE difference in how people see and share your blog.

[hcshort id=”15″]


Hey! I am so glad you wrote about images in blog posts. I kinda struggle in this area. Do you know of other places that offer free images to use?
I mentioned the one I use in the post. Other than your best bet is to google. 🙂