As you may have noticed the facebook Timeline is real now… not one of those things you can start doing in “advance” but real and true it’s now on Facebook, and soon, it will be the default instead of an option.
It took me a long time to warm up to Facebook, and I hear a lot of complaining about the new timeline feature, and I have to tell you… I LOVE IT!! So here’s some tips I have to help you get your timeline working for you.
The cover image…
That’s the big image right at the top of your page. Use it to express yourself… who you are, what you’re about, what you believe. It’s your “first impression”, and it makes a HUGE difference how people will perceive you.
To add your cover image just hover over the bottom right hand corner of that large square. You’ll get a little pop up message where you can choose the option you’d like to use to get your cover image. You can use an image from your facebook photos, or you can upload one from your computer.
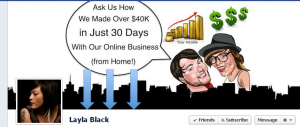
Here’s some different cover photos… see how they land on you:
Remember, at its very essence, Facebook is a social platform, and I’d be very careful using such a direct “home business” cover image…
Be creative, and really look for something that says “you” when someone hits the page.
Your timeline…
This is your content. It’s content you post from your stream, or from your page. You have a lot of control over what shows up on this page now, so take advantage of it. If you’ve promoted on Facebook in a way you’re not quite as “proud of” now, no problem you can go through your whole stream and hide or delete the posts you don’t want people to see.
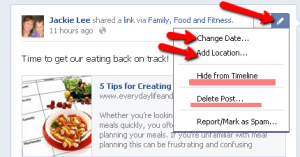
To hide or delete anything in your timeline hover over any box in your timeline. You’ll see a pencil and a star pop up in the top right hand corner. If you click the pencil it will give you “editing” options… it will give you the option to change the date, or add a location. It will also give you the option to hide or delete this item from your timeline. The last option is for things that other people post to your wall ~ which you can hide or delete if you don’t want them to show up, but if it’s spam you can also report the person/post as spam.
Featured items…
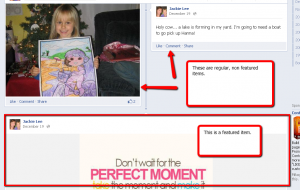
Now if you’d like to highlight some in particular ~ I like to do this with some of the photos/images I post ~ because it looks really nice and brings attention to that item you can “feature the item”. You do this by simply clicking on the star next to the pencil. When you feature an item it will show up across BOTH columns in your timeline. Here’s a look at how something can look when you make it a featured item.
View as…
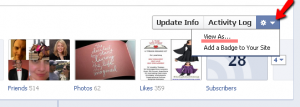
Once you’ve got the basics down you can see it how other people will see it, because depending on your privacy settings different people will see different things when they come to your timeline. Go to the top of the page again… to the left of “activity log” you’ll see a little settings gear. Click that and you’ll get a drop down menu ~ one of the options will be view as:
When you click view as you’ll get a little message asking you to choose someone. When you choose someone you’ll see your page the way they see it. You can also choose “public” and it will show you how “non friends” see your page. This is important when doing business because we want people to be able to get to know us, and if we send them a friend request it’s nice for them to be able to see what we’re about so they feel comfortable accepting that request.
The activity log…
Only YOU can see your activity log, and it is just that, a log of all your activity on Facebook. It’s a really nice way to be able to go back and check on what all you’ve been doing. If you have a social media “schedule” (and you do right?!) it’s a super easy way to, at a glance, see if you’re meeting that schedule or those goals, what you’re posting and when. Very handy!
Update your info…
If you need to update any of your personal info, want to add a website, or change your bio, just click on the “update info” link to the left of your activity log and you’ll be taken to a place where you can change/add something to any piece of your Facebook profile.
If you want to see what it looks like from your profile, just click the little “about” link right below the “small” image of you at the top of the page.
Change profile picture….
If you want to change your profile picture ~ the little square picture in the corner of your cover image… all you have to do is hover over the image and it will give you a pop up to change the image. Again you can choose from a few ways to add the image, from your webcam, your photos, from your computer etc.
At the time of this writing you’ll have 7 days before your timeline goes public. You’ll be the only one who can see the new version of your page. If you’re ready to show the world before that time is up, just go ahead and hit “publish” and your new timeline will be live.
I’m having a BLAST checking out people’s new timeline, so I hope this helps you get yours set up. Once you have it up and running stop by the Facebook page and leave a message so we can stop by and check it out!!








Thanks, Jackie! I don’t have timeline yet but I’m sure it will be very soon. This will be SO helpful!!
everyone can get the timeline now ~ you have to go here and click the link to get started… http://www.facebook.com/about/timeline
Thank you Jackie Lee for the great tips! Shared for you girl!
Thanks 🙂 I’m loving the new timeline, I hope this post helps people feel a little more comfortable making the switch. 🙂